Friday, September 21, 2018

HOW TO INSTALL WORDPRESS PLUGINS

HOW TO INSTALL WORDPRESS PLUGINS
Image result for wordpress and plugin

In this tutorial, you will learn:
How to find and install plugins from the WordPress Plugin Repository, from within the WordPress Dashboard.
    How to upload plugins in .zip format from your computer that you may have purchased or downloaded from another web site.
      How to setup FTP software, and upload a plugin via FTP.
        How to deactivate and delete unused plugins.
          How to quickly add functions to a plugin of your own.
            Pluginception
              FileZilla

                Steps to Install WordPress Plugins

                • After logging into the WordPress Dashboard, click Plugins.
                • Click on the Add New button at the top of the page.
                • Find the plugin that you are looking for from the available options. Searching by Keyword is a common practice when looking for a specific plugin.
                • Click Install Now on the plugin that you want, and then click Activate.
                • Alternatively, if the plugin you want to install is in a Zip file on your computer, simply click Upload Plugin from the Add Plugins page.
                • Then click Choose File, locate it on your computer, double-click the Zip file, and then click Install Now. Then click the Activate Plugin link.

                Installing Plugins Using FTP

                • Another more complicated approach is to upload the file via FTP. First, I will insert a video to help you get acquainted with connecting to your WordPress web site via FTP.
                • Next, unzip the plugin files to your computer.
                • Now, upload the plugin files to the wp-content / plugins folder on your server.
                • Now, back in your WordPress Dashboard, click Plugins.
                • Click Activate on the recently uploaded plugin.

                Creating a New Custom Plugin

                • A simple way to create a small custom plugin is by using another plugin called Pluginception.
                • Use one of the previously discussed plugin installation methods to get Pluginception installed.
                • Under the Plugins menu, click Create a New Plugin.
                • Fill in the Plugin Name box, and click the Create a Blank Plugin button.
                • Paste in any functions or code that you have, and click the Update File button.

                Deleting a WordPress Plugin

                To delete a plugin from your Dashboard, simply visit the Plugins page, click the Deactivate link for the plugin that you want to remove, and then click the Delete link.
                Commonly, when seeking ways to customize your web site, it may be suggested to add functions to the functions.php file of a theme or child theme. Most of the time, those functions can be used in a plugin instead. This is the preferred route when the customization being made are not theme specific so that they are still applied if you were to ever choose a new theme.

                Thursday, August 3, 2017

                How To Install Your Theme Manualley Via FTP

                How To Install Your Theme Manualley Via FTP
                Now that you have purchased this wonderful theme, it’s time to install it in WordPress!

                Step 1: Download The Theme & Locate Total.zip

                If you already downloaded the theme after you first purchased it, you may have file called something like “themeforest-6339019-total-responsive-multipurpose-wordpress-theme.zip“. If that is the case be sure to extract the zip file and inside it browse to Installable-Theme/Total.zip. The Total.zip file is the one you want to upload to WordPress.
                If you did not download the theme after purchase then you will want to log into ThemeForest and go to your “downloads” and download the “Installable WordPress file only” zip file as shown in the screenshot below. You don’t have to worry about the documentation because that is all online here!total-installable-theme

                Step 2: Make sure WordPress Is Up To Date!

                Total is a powerful theme and makes use of all the latest WordPress functions to ensure the theme is coded as best as possible and is highly optimized, please make sure WordPress is fully up to date before installing the theme!
                You should ALWAYS be running the latest version of WordPress anyway, because otherwise you put your whole site at risk for potential threats. Never use an outdated version of WordPress!

                Step 3: Install Via WordPress or FTP

                Now that you made sure WordPress is up to date you can go a head and install the theme and there are 2 methods for doing so: via WordPress or via FTP. If you are working with WordPress and buying themes you should pretty much know how to install a theme, but below are some screenshots just incase you don’t know how!

                Install Via WordPress

                Log into your WordPress website and browse to Appearance > Themes
                Browse to Appearance > Themes
                Then click on the option to upload theme.

                Upload Theme

                Next browse for the zipped theme file you downloaded from ThemeForest (make sure you have downloaded the “Installable zip” as this is what you would upload to WordPress. If you downloaded the whole package be sure to extract it and locate the theme which is inside the “Installable Theme” folder and is called “Total.zip”)

                Browse For The Zip File

                Once WordPress has unpacked and installed the theme, just click to activate it.

                Activate Total

                Install Via FTP
                Your second installation option is to upload the theme via FTP. For this method first log into your site via FTP and browse to your folder located at wp-content/themes. Unzip the theme file you downloaded from Themeforest and upload only the extracted Total folder to your server.
                ftp
                Next log into your WordPress site and navigate to Appearance > Themes to activate Theme

                Activate Total


                Tuesday, August 1, 2017

                How to Add Google Analytics to WordPress

                How to Add Google Analytics to WordPress
                Adding Google Analytics to WordPress is a painless process. There are numerous ways to do it. Today, we will follow some simple steps to get it added.
                There is a plugin in the WordPress Plugin Repository that allows us to not only add the Google Analytics code, but load it in such a way that passes the Google PageSpeed Insights test.
                By default, the Google Analytic’s script has a low 2 hour cache time set, which ironically triggers a flag in Google PageSpeed Insights.
                The aforementioned plugin will let you add your Tracking ID, load the tracking code in the footer, and also load the script locally.
                Loading the script locally bypasses the 2 hour cache limitation, removing the flag set by Google’s Page Speed test.
                There is one caveat however, and that is that Google doesn’t support the local storage of the script.
                The reason Google does not prefer the local serving of the script, is because it can quickly become out of date when upgrades occur.
                However, the plugin that stores it, also leverages WP Cron to auto-update the script, so that concern becomes moot.

                Before you move on:

                • Make sure that you have a Google Account. Having a Gmail email address or YouTube account qualifies.
                • Make sure that you have already added your web site to Google’s Search Console. This process is covered in the video, but not below in the written instructions.
                How to add your site to Google Analytics.
                1. Point your web browser to: google.com/analytics
                2. Click Sign In at the top right, then click Analytics. If prompted, login with your main Google Account.
                3. Click the Sign Up button.
                4. Type in an Account Name similar to the name of your web site.
                5. Type in your Website Name.
                6. Choose the protocol for your web site: http or https
                7. Paste in your Website URL.
                8. Choose an Industry Category that best matches what your site is about.
                9. Change the Reporting Time Zone to match your local time.
                10. Specify any Data Sharing Settings you are interested in. Read about them to see if they matter to you.
                11. Click the Get Tracking ID button.
                12. When prompted to accept the Terms of Service, choose your country, read the Terms, and if you accept, click the I Accept button.
                13. Copy your Tracking ID for later use.
                Assuming you have already setup your web site within the Google Search Console, let’s move on to the next steps.
                How to connect Google Analytics with Google Search Console.
                1. Click on Property Settings on the left side.
                2. Scroll down, and click the Adjust Search Console button, then scroll back up.
                3. Click the Edit link.
                4. Choose the preferred version of your site (with or without https, with or without www), then click the Save button.
                5. You will now land in the Search Console. You can close that window to go back to Analytics.
                6. Click the Done button. Refreshing the page will show the connection between Analytics and Search Console.
                Now, with your Analytics Tracking ID handy, let’s go back to your WordPress Dashboard.
                If you haven’t yet copied the Tracking ID, you can click the Tracking Info, then Tracking Code link in the Analytics Dashboard to get it.
                How to add Google Analytics to WordPress.
                1. From within your WordPress Dashboard, click Plugins, then Add New.
                2. Do a search for: Complete Analytics Optimization Suite
                3. Click Install Now, then Activate.
                4. Click Settings, then Optimize Analytics.
                5. Paste in your Tracking ID in the top box.
                6. Choose Footer for the location, unless you have a specific reason to choose Header.
                7. Select Anonymize IP if applicable.
                8. Click the Save Changes button.
                To test placement, you can either:
                • Wait for Google Analytics to start reporting data. Visit your Google Analytics Dashboard to see. You can also have GA send test traffic.
                • Or, enable the ‘Track logged in Administrators’ feature in the Complete Analytics Optimization Suite, then visit your site, right-click and View Source, then do a Find for your Tracking ID.

                Tuesday, July 18, 2017

                54 WordPress Keyboard Shortcuts To Improve Blogger Productivity

                WordPress includes many keyboard accelerator keys also known as keyboard shortcuts or hotkeys that make the program easier to work with menus and commands. With keyboard shortcuts, it make user easier to perform task and interact with computer, which otherwise would typically require a mouse or other pointing device to perform the operation.
                Here’s the full list of WordPress keyboard shortcuts or accelerator hotkeys which available for WordPress user increase their productivity, as published by WordPress.
                Ease of Access keyboard shortcuts
                Moving around WordPress for navigation
                Arrow keys (←, →, ↑ and ↓): Scroll through the post content
                Backspace: To move back to the previous page
                Hold Shift + Backspace: To move forward page
                Tab: To the next clickable link/option on the page starting from the top.
                Tab + multiple times: To move from one option to another
                Hold Shift + Tab: To move back
                Enter: To confirm a dialog box or access an option

                Post Editing
                Content management
                Shift + ← / →: Highlight content per character
                Ctrl + Shift + ← / →: Highlight content per word
                Shift + ↑ / ↓: Highlight above/below line
                Ctrl + A: Select all content
                Ctrl + Shift + V: Paste content without formatting

                Content formatting
                Shift + Alt + D: Strikethrough text
                Ctrl + K: Insert link
                Shift + Alt + S: Remove link
                Shift + Alt + 1: Apply heading 1
                Shift + Alt + 2: Apply heading 2
                Shift + Alt + 3: Apply heading 3
                Shift + Alt + 4: Apply heading 4
                Shift + Alt + 5: Apply heading 5
                Shift + Alt + 6: Apply heading 6
                Shift + Alt + 7: Apply paragraph formatting
                Shift + Alt + U: Start bullet list
                Shift + Alt + O: Start numbered list
                Shift + Alt + Q: Blockquote
                Shift + Alt + X: Apply code formatting
                Shift + Alt + 9: Apply Address formatting
                Shift + Alt + C: Align center
                Shift + Alt + R: Align right
                Shift + Alt + L: Align left
                Shift + Alt + J: Justify
                Shift + Alt + M: Add media
                Shift + Alt + Z: Toggle toolbar
                Shift + Alt + P: Insert Page Break tag
                Shift + Alt + T: Insert Read More tag
                Shift + Alt + W: Enable/disable Distraction free mode
                Shift + Alt + H: Open help

                Comment
                Comment navigations
                J: To move down in the comments (Or move to the next page)
                K: To move up in the comments (Or move back to the previous page)

                Comment actions
                A: Approve comment
                S: Mark as spam
                D: Move to trash
                Z: Undo recent action
                U: Unapprove comment
                R: Reply to comment
                Q: Enable quick edit
                E: Open comment editing screen

                Apply actions in bulk
                Shift + X: Select all comments
                Shift + A: Approve all selected comments
                Shift + T: Trash selected comments
                Shift + D: Permanently delete selected comments
                Shift + S: Mark selected comments as spam
                Shift + U: Unapprove selected comments
                Shift + Z: Restore select comments
                To enable the keyboard shortcuts for the comment moderation section. WordPress user need go to user profile and then enable the option “Enable keyboard shortcuts for comment moderation” to activate keyboard shortcuts.

                Friday, April 28, 2017

                Hiding the Download URL of the File with Simple Download Monitor Plugin

                Hiding the Download URL of the File with Simple Download Monitor Plugin
                Image result for Hiding the Download URL of the File with Simple Download Monitor Plugin

                The simple download monitor plugin has an option that you can use to keep the download URL of the file hidden. This can be useful if you are offering some password protected file downloads and you want to keep the actual URL of those files hidden.
                First, Quickly Install the Free Plugin (if you don’t have it)
                1. Download the Simple Download Monitor Plugin from the plugin page of the WordPress repository.
                2. In the WordPress Dashboard menu, select Plugins, then click Add New.
                3. Search for “Simple Download Monitor” and locate the Simple Download Monitor Plugin in the list of results.
                4. Click the Install Now link, then Activate it.
                Configure a New Download Item

                Enabling PHP Dispatching To All New Downloads
                Note :

                You can install the plugin using the following steps:
                Step 1) Click Downloads, then Add New from the left-hand menu.
                Step 2) Configure the download item as usual.
                Step 3) Check the “PHP Dispatch” option. See screenshot below:
                Step 4) Optionally, set a password for the download (if you want to apply password protection to this download).
                Step 5) Embed this download item on any post or page using the standard SDM plugin shortcode.
                When your users download this item, the actual file URL of the item will now be hidden.
                You can go to the settings menu of the plugin and check the “PHP Dispatching” option if you want this option to be enabled by default for all new download items that you configure.
                If you are using a very large file on a cheap shared hosting with low RAM memory limit then this option may not work correctly. Read our WordPress hosting recommendation guide to learn more on this.

                How to Install a WordPress Theme

                How to Install a WordPress Theme

                Image result for HOW TO INSTALL A WORDPRESS THEME

                In this tutorial, you will learn:
                • How to find and install themes from the WordPress Theme Repository, from within the WordPress Dashboard.
                • How to upload themes in .zip format from your computer that you may have purchased or downloaded from another web site.
                • How to remove any unused themes from your WordPress Dashboard.

                Steps to Install WordPress Themes and to Delete Unused Themes

                1. After logging into the WordPress Dashboard, click Appearance.
                2. You may select any of the existing themes by clicking Activate.
                3. Otherwise, you may click Add New to find other themes to install.
                4. You can filter your selection by choosing Featured, Popular, Latest, Favorites, or by using the advanced feature filter. Otherwise, you can do a search for a specific theme.
                5. After you find a theme, you can Preview it, or you can install it right away by hovering over the theme image, and then clicking Install.
                6. If the theme you want to install is in a Zip file on your computer, simply click Upload Theme from the Themes page.
                7. Then click Choose File, locate it on your computer, double-click the Zip file, and then click Install Now.
                8. You will then be given the option to do a Live Preview or to Activate the newly installed theme.
                9. Now, to delete any unused themes, go to Appearance, click on the theme you want to remove, and click the Delete link.

                How to Use Widgets in WordPress

                How to Use Widgets in WordPress
                Image result for HOW TO USE WIDGETS IN WORDPRESS

                In this tutorial, you will learn:
                • How to use Widgets the standard way.
                • How to manage widgets in the more preferred Live Preview mode.
                • How to add Extra Sidebar Widgets.
                • How to conditionally show a Widget based on a specific page or section of the web site.

                Steps for Managing WordPress Widgets, and Showing them Conditionally

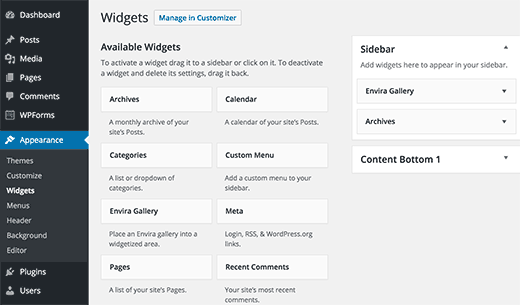
                1. After logging into the WordPress Dashboard, click on Appearance, and then Widgets.
                2. Drag a Widget to where you want to place it in a Widget Area.
                3. Make any desired changes to the Widget settings, and click Save.
                4. View the changes on the web site.
                5. You can preview changes to Widgets before making them live, by using the Live Preview mode in the WordPress Customizer. At the top of the standard Widgets screen, you can click the Manage with Live Preview button. Otherwise, click Appearance, then Customize, then Widgets.
                6. Once there, you will see all of the Widget areas defined by the theme, and any plugins. Choose a Widget area that you want to make changes to.
                7. Click the Add a Widget button. Choose a Widget to Preview how it will look on the web site. Reorder the widgets if desired.
                8. Click Save & Publish if you are content, or click the X button, and confirm by clicking the Leave button if you do not want to save your changes.
                9. You can browse the WordPress Plugin Repository to add more Widgets, or you can include a bundle of new Widgets offered by the JetPack plugin.
                10. To see the extra Widgets offered by JetPack, you can install JetPack, activate it with your WordPress.com account, and choose the Free plan if desired.
                11. Now, go to JetPack, and then Settings, and then Appearance in the WordPress Menu.
                12. Activate Extra Sidebar Widgets, and also activate Widget Visibility while you are in there, as we will be covering that next.
                13. Now go back to Appearance, Customize, Widgets to browse the new Widget inventory, which includes additional subscription, social, and translation options.
                14. Now, open any of the Widgets that you have included, and click the Visibility button. In there you can define a set of rules for what areas of the web site that particular widget will or will not show up on.
                15. Finally, make sure to save your changes before exiting.

                How to Use FileZilla with WordPress

                How to Use FileZilla with WordPress
                In this tutorial, you will learn:
                • How to configure FileZilla to connect to your WordPress web site.
                • How to login to the server via SFTP or FTP.
                • How to upload and download files to and from the server.
                • Common uses for connecting to the filesystem of a WordPress web site.

                Steps to Configure FileZilla, and Connect to a WordPress Server

                1. First, open the FileZilla client on your computer.
                2. Next, open the Site Manager from the File menu.
                3. Click the New Site button, and give it a name.
                4. Next, you must add the credentials to login to the server. You may have received a Welcome email from your host with this information. Otherwise, it may be found in the Control Panel of the server. You may also contact your host to get this information.
                5. If you have the option, you should choose SFTP or Secure FTP as the protocol. Otherwise, leave it set as FTP.
                6. Enter the Host name, which could be a friendly name like ftp.example.com, or an IP Address.
                7. Enter a Port Number if one was provided. It may be required in order to connect, particularly if you are connecting via SFTP.
                8. For Logon Type, it’s considered more secure to choose the Ask for Password option. You can store your password in a secure password manager. Otherwise, select Normal, and allow FileZilla to store your password. Your host may have provided different options for Logon Type, but Ask for Password and Normal are the most common.
                9. Enter the provided username. If you chose to have FileZilla store your password, you may enter that now as well. Otherwise you will be prompted for the password when attempting to connect.
                10. Now, you can choose this newly created entry from the Site Manager, and click Connect.
                11. Once connected, in the Remote Site panel, you should see WordPress related folders such as: wp-admin, wp-content, and wp-includes. On some hosts, you may land somewhere else. Commonly, you may see folders such as www or public_html, or maybe even a list of web sites within your account. Traverse the folders until you see the WordPress related folders mentioned.
                12. To upload one or more files, simply choose the files from the Local Site panel, and drag them over to the Remote Site panel. Do the opposite to download files from the server to your computer.
                Commonly, FTP software such as FileZilla is used to upload themes or plugins to a WordPress web site. However, these tasks can be performed within the WordPress Dashboard as well. Other uses include uploading favicon images, setting file permissions or manually modifying configuration files such as robots.txt, wp-config.php, and .htaccess.

                How to Enable JetPack in WordPress

                How to Enable JetPack in WordPress
                In this tutorial, you will learn:
                • How to create a WordPress.com account.
                • How to install and activate JetPack.
                • How to connect JetPack with your WordPress.com account.

                JetPack extends the abilities of a hosted WordPress.com web site, and many of its features are reliant on the WordPress.com servers. We have the ability to use JetPack on our self-hosted WordPress web sites using the JetPack plugin, but we must connect our site to a WordPress.com account to open up its many features. Let’s go through those steps quickly right now.

                Steps for Enabling JetPack Within a WordPress.org Web Site

                1. First, point your web browser to wordpress.com/start/account/user. This will allow you to create an account without having to also create a WordPress.com web site.
                2. Fill in the registration form with an email address, username and password.
                3. Click the Create My Account button.
                4. Click the Confirm Now button in your email to Activate your WordPress.com account.
                5. Now, back inside your self-hosted WordPress Dashboard, click on Plugins and then Add New to install JetPack.
                6. You should see JetPack by WordPress.com right away in the Featured section, otherwise do a search for JetPack by WordPress.com.
                7. Then, click on Install Now, and then Activate.
                8. Now, click the Connect to WordPress.com button. You should already be logged into your WordPress.com account from the previous steps.
                9. Authorize your web site with your WordPress.com account by clicking the Approve button.
                10. For now, click on the Select Free button to move along with this tutorial.
                The JetPack Settings menu should now be available for you within the WordPress Dashboard of your self-hosted web site, to allow you to customize your JetPack experience.
                Your JetPack account is free, but you can always upgrade at any time for more advanced security and backup options.